Building a Store Finder with Storyblok and Vue.js
Storyblok is the first headless CMS that works for developers & marketers alike.
When we build websites for companies with several stores, it is often desirable to make it as easy as possible for the users to find their nearest location. In this article you’ll learn how to build a Store Finder featuring a Google Map and a search functionality for stores nearby. We will use Storyblok as our headless CMS of choice to provide the location data and Vue.js is used to build the Store Finder application itself.

The store content type
Let's begin with creating our content structure in Storyblok by creating a new content type named story_store.

Because I use the approach I've described in my article about how to structure content as Stories, Chapters and Paragraphs with Storyblok we prefix the content type with story. So we have to make sure to use Store as its display name because otherwise the auto generated name would be Story Store. We don't want the new content type to be nestable.
Now we can edit the schema of our newly created content type. We add two new fields address and opening_hours. Both of those fields are custom plugins which you have to install first.

You can read more about the address field and how to install it in my previous article about this topic.

I’ve also written an article about how to build an opening hours plugin, checkout the article to learn how to install this plugin.
Adding new stores
Our store content type is ready now and we can start to add some locations. But first, we add a new folder for our stores. This makes it more convenient to manage the store locations in the future.

Next we can add a new store story and enter some data.


Basic project setup
We build our Store Finder application on top of a basic Vue CLI 3.0 setup. If you want to read more about how to set up a Vue.js powered SPA from the ground up I highly recommend you to head over to the official documentation and come back afterwards.
If you want to view the entire code right away, instead of following this step-by-step guide, you can also check out this GitHub repository.
The StoreFinder component
Let's begin with laying out the basic application structure for our Google Maps and Storyblok powered Store Finder. First we create a new file src/components/StoreFinder.vue.
<template>
  <div class="StoreFinder">
    <div class="StoreFinder__search">
      <!-- StoreFinderSearch -->
    </div>
    <div class="StoreFinder__grid">
      <div class="StoreFinder__list-wrap">
        <!-- StoreFinderList -->
      </div>
      <div class="StoreFinder__map-wrap">
        <!-- StoreFinderMap -->
      </div>
    </div>
  </div>
</template>

<script>
export default {
  name: 'StoreFinder',
  props: {
    stores: {
      default: () => [],
      required: true,
      type: Array,
    },
  },
};
</script>
The StoreFinder component is responsible for the overall layout and for integrating all of the separate components for our Store Finder application.
<template>
  <div class="App o-container">
    <h1 class="App__headline">
      Store Finder
    </h1>
    <StoreFinder
      v-if="stores.length"
      :stores="stores"
      class="App__store-finder"
    />
  </div>
</template>

<script>
import StoreFinder from './components/StoreFinder.vue';

export default {
  name: 'App',
  components: {
    StoreFinder,
  },
  data() {
    return {
      stores: [],
    };
  },
};
</script>

<style lang="scss">
@import './assets/scss/settings/**/*';
@import './assets/scss/generic/**/*';
@import '{
  .o-container,
} from ~@avalanche/object-container';

.App {
  padding-top: setting-spacing(xl);
  padding-bottom: setting-spacing(xl);
}

.App__headline {
  text-align: center;
}

.App__store-finder {
  margin-top: setting-spacing(xxl);
}
</style>
Above you can see that we've added our newly created component to the core src/App.vue component. You might notice the usage of glob patterns **/* and the special @import { .o-container } from ~@avalanche/object-container' import syntax in the <style> section. This is made possible by the node-sass-magic-importer node-sass custom importer function. But that's not particular important for the functionality of this application.
The data() property of our component provides an empty array by default. Let's move on and see how we can fetch the data for the stores we previously added in the Storyblok app.
The Storyblok API util
Storyblok provides us with a npm package which we can use to easily connect to the Storyblok API.
npm install storyblok-js-clientAfter installing the storyblok-js-client dependency via npm we can use it inside of our application. In order to fetch data from Storyblok we have to initialize a new StoryblokClient instance.
// src/utils/storyblok.js
import StoryblokClient from 'storyblok-js-client';

// This is the place for your personal access
// token which you can find in the settings
// section of your Storyblok space.
const ACCESS_TOKEN = 'E4hKZiPPl2OZ6ErnofrW2Att';

export default new StoryblokClient({
  accessToken: ACCESS_TOKEN,
});
The store service
We can use the API utility function from the previous step to fetch the data of the stores we've created earlier from Storyblok.
// src/services/store.js
import storyblok from '../utils/storyblok';

// In this example we assume we have <= 100 stores,
// if you have more than that you need to make
// additional API requests to fetch all pages.
const PER_PAGE_MAX = 100;

export async function list(options) {
  const defaultOptions = {
    resolve_links: 1,
    per_page: PER_PAGE_MAX,
  };
  const response = await storyblok.get('cdn/stories', {
    filter_query: {
      // Only fetch stories of type `story_store`.
      component: {
        in: 'story_store',
      },
    },
    ...defaultOptions,
    ...options,
  });

  return response.data.stories;
}
In the following code snippet you can see how we can use the store service in combination with our App component.
 <script>
+import * as storeService from './services/store';
+
 import StoreFinder from './components/StoreFinder.vue';

 export default {
   name: 'App',
   components: {
     StoreFinder,
   },
   data() {
     return {
       stores: [],
     };
   },
+  created() {
+    // Initially fetch all stores.
+    this.fetchStores();
+  },
+  methods: {
+    async fetchStores() {
+      this.stores = await storeService.list();
+    },
+  },
 };
 </script>
Once we have integrated the store service into our application, we have all the data we need in order to bring the app to life.
Rendering a list of stores
In the first step, we want to render a list of all of our locations showing their address and opening hours data. Let's start with the component which is responsible for rendering a single store list item.
<template>
  <li class="StoreFinderItem">
    <address  class="StoreFinderItem__section">
      <div class="StoreFinderItem__section">
        <div class="StoreFinderItem__headline">
          {{ name }}
        </div>
        {{ address.postal_code }}
        {{ address.town }}<br>
        {{ address.street }}
      </div>
      <div
        v-if="address.phone || address.fax"
        class="StoreFinderItem__section"
      >
        <template v-if="address.phone">
          Tel.:
          <a
            v-text="address.phone"
            :href="`tel:${address.phone}`"
          />
          <br>
        </template>
        <template v-if="address.fax">
          Fax: {{ address.fax }}
        </template>
      </div>
    </address>
    <div class="StoreFinderItem__section">
      <OpeningHours :days="openingHours.days"/>
    </div>
    <div class="StoreFinderItem__section">
      <a :href="directionsUrl">
        Directions
      </a>
    </div>
  </li>
</template>

<script>
import OpeningHours from './OpeningHours.vue';

export default {
  name: 'StoreFinderItem',
  components: {
    OpeningHours,
  },
  props: {
    address: {
      default: () => ({}),
      required: true,
      type: Object,
    },
    name: {
      default: '',
      required: true,
      type: String,
    },
    openingHours: {
      default: () => ({}),
      required: true,
      type: Object,
    },
  },
  created() {
    // Create a Google Maps URL,
    // for directions to the shop.
    const url = 'https://www.google.com/maps/dir/?api=1';
    const destination = [
      this.address.street,
      `${this.address.postal_code} ${this.address.town}`,
    ].join(', ');
    this.directionsUrl = `${url}&destination=${encodeURI(destination)}`;
  },
};
</script>

<style lang="scss">
@import '../assets/scss/settings/**/*';

.StoreFinderItem__headline {
  font-weight: bold;
}

.StoreFinderItem__section {
  &:not(:first-child) {
    margin-top: setting-spacing(s);
  }
}
</style>
Let's quickly walk through the code of the StoreFinderItem component you can see above. First of all, we render all the address data which are passed to the component via the address property. Because some store might not have a phone or fax number, we check if either one or both are available. Next you can see that we include an OpeningHours component. I won't go into much detail about the implementation of this particular component, if you're interested in that, you can read more about it in the article about how to build an opening hours Storyblok plugin.
<template>
  <ul class="StoreFinderList">
    <StoreFinderItem
      v-for="store in stores"
      :key="store.id"
      :address="store.content.address"
      :name="store.name"
      :opening-hours="store.content.opening_hours"
      class="StoreFinderList__item"
    />
  </ul>
</template>

<script>
import StoreFinderItem from './StoreFinderItem.vue';

export default {
  name: 'StoreFinderList',
  components: {
    StoreFinderItem,
  },
  props: {
    stores: {
      default: () => [],
      required: true,
      type: Array,
    },
  },
};
</script>

<style lang="scss">
@import '../assets/scss/settings/**/*';

.StoreFinderList__item {
  &:not(:first-child) {
    margin-top: setting-spacing(m);
    padding-top: setting-spacing(m);
    border-top: 1px solid #e0e0e0;
  }
}
</style>
The StoreFinderList component is responsible for rendering a list of StoreFinderItem components. Each StoreFinderItem represents one of our stores. Apart from rendering the stores and applying some very basic styling, not much is going on in this component.
     </div>
     <div class="StoreFinder__grid">
       <div class="StoreFinder__list-wrap">
        <!-- StoreFinderList -->
        <StoreFinderList :stores="stores"/>
       </div>
       <div class="StoreFinder__map-wrap">
<!-- StoreFinderMap --> </template>
<script>
import StoreFinderList from './StoreFinderList.vue';
export default {
name: 'StoreFinder',
components: {
StoreFinderList,
},
props: {
stores: {
default: () => [],Now we can use our newly created StoreFinderList component inside of the StoreFinder component in order to render all of our stores as a list. In the two diffs above you can see how we integrate the StoreFinderList into the StoreFinder.

Rendering the stores on a Google Map
Next, we want to render a Google Map showing the exact location of all our stores alongside the list of store addresses and opening hours.
<template>
  <div class="StoreFinderMap"/>
</template>

<script>
import MarkerClusterer from '@google/markerclusterer';

import gmapsInit from '../utils/gmaps';

export default {
  name: 'StoreFinderMap',
  props: {
    stores: {
      default: () => [],
      required: true,
      type: Array,
    },
  },
  async mounted() {
    try {
      this.google = await gmapsInit();
      this.geocoder = new this.google.maps.Geocoder();
      this.map = new this.google.maps.Map(this.$el);

      // Zoom to Europe.
      this.geocoder.geocode({ address: 'Europe' }, (results, status) => {
        if (status !== 'OK' || !results[0]) {
          throw new Error(status);
        }
        this.map.setCenter(results[0].geometry.location);
        this.map.fitBounds(results[0].geometry.viewport);
      });

      // Initialize and cluster markers.
      const markerClickHandler = (marker) => {
        this.map.setZoom(16);
        this.map.setCenter(marker.getPosition());
      };
      const markers = this.stores
        .map((store) => {
          const marker = new this.google.maps.Marker({
            position: {
              lat: store.content.address.latitude,
              lng: store.content.address.longitude,
            },
            map: this.map,
          });
          marker.addListener('click', () => markerClickHandler(marker));
          return marker;
        });

      new MarkerClusterer(this.map, markers, {
        imagePath: 'https://developers.google.com/maps/documentation/javascript/examples/markerclusterer/m',
      });
    } catch (error) {
      // Implement your own error handling here.
      console.error(error);
    }
  },
};
</script>

<style lang="scss">
.StoreFinderMap {
  width: 100%;
  height: 100%;
  min-height: 15em;
}
</style>
Above you can see the implementation of the StoreFinderMap component. After initializing Google Maps with the gmapsInit() utility function, we can create a new map instance with this.google.maps.Map(). If you're interested in the implementation of gmapsInit() you can find it on GitHub.
After initializing new instances of Geocoder and Map, we use the Geocoder instance to zoom our newly created map to Europe. Next we specify a callback function that should be triggered whenever a marker on our map is clicked. The click handler callback simply zooms the map to the clicked marker. In order to initialize a marker for each of our stores, we iterate over all of the stores and create a new marker for each of it by creating a new marker instance with this.google.maps.Marker().
Last but not least, we create a new MarkerClusterer instance in order to cluster markers that are close to each other. To make this work we need to npm install the @google/markerclusterer package first.
npm install @google/markerclustererIn the following code snippets you can see how we can integrate the StoreFinderMap component into the StorFinder component.
         <StoreFinderList :stores="stores"/>
       </div>
       <div class="StoreFinder__map-wrap">
        <!-- StoreFinderMap -->
        <StoreFinderMap :stores="stores"/>
       </div>
     </div>
</div> <script>
import StoreFinderList from './StoreFinderList.vue';
import StoreFinderMap from './StoreFinderMap.vue';
export default {
name: 'StoreFinder',
components: {
StoreFinderList,
StoreFinderMap,
},
props: {
stores: {After integrating our new StoreFinderMap component into the StoreFinder we also have to make a few adjustments to the styling of our application.
@import '../assets/scss/settings/**/*';

.StoreFinder__grid {
  $breakpoint: 42em;

  display: flex;
  border: 1px solid #e0e0e0;
  border-radius: 0.25em;

  @media (max-width: $breakpoint - 0.0625em) {
    flex-direction: column-reverse;
  }

  @media (min-width: $breakpoint) {
    height: 32em;
  }
}

.StoreFinder__list-wrap {
  padding: setting-spacing(m);
  overflow: auto;
  background-color: #fff;
}

.StoreFinder__map-wrap {
  flex-grow: 1;
}
Above you can see the <style> section of the StoreFinder component. The @import '../assets/scss/settings/**/*' statement imports some helper functions for commonly used setting variables like spacings.

Search and sort stores by address
Although we've already accomplished a lot, the most important functionality is still missing: searching and sorting stores based on the users location.
<template>
  <form
    class="StoreFinderSearch"
    @submit.prevent="searchAddress"
  >
    <input
      v-model="address"
      placeholder="Enter your address"
      aria-label="Your address"
      class="StoreFinderSearch__input StoreFinderSearch__form-element"
    >
    <button class="StoreFinderSearch__form-element">
      Search store
    </button>
    <button
      type="button"
      class="StoreFinderSearch__form-element"
      @click="searchNearBy"
    >
      Stores near me
    </button>
  </form>
</template>

<script>
import gmapsInit from '../utils/gmaps';

export default {
  name: 'StoreFinderSearch',
  data() {
    return {
      address: null,
    };
  },
  async created() {
    this.google = await gmapsInit();
    this.geocoder = new this.google.maps.Geocoder();
  },
  methods: {
    searchAddress() {
      this.geocoder.geocode({ address: this.address }, (results, status) => {
        if (status !== 'OK' || !results[0]) return;

        // Set address field to the address
        // found by the Google Maps API and
        // emit a search event with the found
        // coordinates.
        this.address = results[0].formatted_address;
        this.$emit('search', {
          latitude: results[0].geometry.location.lat(),
          longitude: results[0].geometry.location.lng(),
        });
      });
    },
    async searchNearBy() {
      const {
        latitude,
        longitude,
      } = await new Promise((resolve, reject) => {
        navigator.geolocation.getCurrentPosition(
          ({ coords }) => resolve(coords),
          // Reject if the user doesn't
          // allow accessing their location.
          error => reject(error),
        );
      });

      const latLng = new this.google.maps.LatLng(latitude, longitude);
      this.geocoder.geocode({ latLng }, (results, status) => {
        if (status !== 'OK' || !results[0]) return;

        // Set address field to the address
        // found by the Google Maps API and
        // emit a search event with the users
        // coordinates.
        this.address = results[0].formatted_address;
        this.$emit('search', {
          latitude: results[0].geometry.location.lat(),
          longitude: results[0].geometry.location.lng(),
        });
      });
    },
  },
};
</script>

<style lang="scss">
@import '../assets/scss/settings/**/*';

$breakpoint: 42em;

.StoreFinderSearch {
  display: flex;

  @media (max-width: $breakpoint - 0.0625em) {
    flex-direction: column;
  }
}

.StoreFinderSearch__form-element {
  padding: setting-spacing(s);
  border: 1px solid #e0e0e0;
  border-radius: 0.25em;

  @media (max-width: $breakpoint - 0.0625em) {
    &:not(:first-child) {
      margin-top: setting-spacing(xs);
    }
  }

  @media (min-width: $breakpoint) {
    &:not(:first-child) {
      margin-left: setting-spacing(xs);
    }
  }
}

.StoreFinderSearch__input {
  flex-grow: 1;
}
</style>
In the code snippet above you can see the new StoreFinderSearch component. This component is responsible for rendering a search form with an input field and two buttons. If the user enters their address into the input field and submits the form by pressing enter or clicking the first button, the searchAddress() method is triggered. The searchAddress() method takes the address string entered by the user and sends it to the Google Maps API to get the corresponding location data. We emit a search event with the found coordinates as its value which we can later use to calculate the nearest store.
If a user clicks the second button, we use the browsers Geolocation API to get the current location of the user and send it to the Google Maps API in order to find out the corresponding address. Again we emit the coordinates as a search event.
 <template>
   <div class="StoreFinder">
     <div class="StoreFinder__search">
      <!-- StoreFinderSearch -->
      <StoreFinderSearch @search="currentCoordinates = $event"/>
     </div>
     <div class="StoreFinder__grid">
       <div class="StoreFinder__list-wrap">
        <StoreFinderList :stores="stores"/>
        <StoreFinderList :stores="storesOrderedByDistance"/>
       </div>
       <div class="StoreFinder__map-wrap">
        <StoreFinderMap :stores="stores"/>
        <StoreFinderMap
          :stores="storesOrderedByDistance"
          :current-location="currentCoordinates"
        />
       </div>
     </div>
   </div>
 </template>

 <script>
import {
  convertUnit,
  orderByDistance,
} from 'geolib';

 import StoreFinderList from './StoreFinderList.vue';
 import StoreFinderMap from './StoreFinderMap.vue';
import StoreFinderSearch from './StoreFinderSearch.vue';

 export default {
   name: 'StoreFinder',
   components: {
     StoreFinderList,
     StoreFinderMap,
    StoreFinderSearch,
   },
   props: {
     stores: {
       default: () => [],
       required: true,
       type: Array,
     },
   },
  data() {
    return {
      currentCoordinates: null,
    };
  },
  computed: {
    storeCoordinates() {
      return this.stores.map(store => ({
        latitude: store.content.address.latitude,
        longitude: store.content.address.longitude,
      }));
    },
    storesOrderedByDistance() {
      if (!this.currentCoordinates) return this.stores;

      const orderAndDistance = orderByDistance(
        this.currentCoordinates,
        this.storeCoordinates,
      );

      return orderAndDistance.map(({ distance, key }) => ({
        ...this.stores[key],
        distance: convertUnit('km', distance, 1),
      }));
    },
  },
 };
 </script>
This time we have to make some more advanced changes to the StoreFinder component to make the new StoreFinderSearch component work as expected.
We listen to the search event on the StoreFinderSearch component and set the currentCoordinates to the value it emits. This triggers the new storesOrderedByDistance() computed property to update and to return the list of stores ordered by the distance to the currentCoordinates. We also pass this new computed property to the child components instead of directly passing the stores property to them.
We use the geolib package to help us sort stores by distance to specific coordinates. This means we also have to install this package first.
npm install geolibNext we also want to make some updates to the StoreFinderMap component. We now pass the value of currentLocation as a property to this component. Additionally we watch the value of this property for changes. Every time its value changes the currentLocation() watcher function is triggered and we zoom the map to the location nearest to the coordinates of currentLocation.
 export default {
   name: 'StoreFinderMap',
   props: {
    currentLocation: {
      default: () => ({}),
      type: Object,
    },
     stores: {
       default: () => [],
       required: true,
       type: Array,
     },
   },
  watch: {
    currentLocation() {
      // Zoom to the nearest store relative
      // to the current location.
      const nearestStore = this.stores[0];
      const { latitude, longitude } = nearestStore.content.address;
      const latLng = new this.google.maps.LatLng(latitude, longitude);
      this.geocoder.geocode({ latLng }, (results, status) => {
        if (status !== 'OK' || !results[0]) return;

        this.map.setCenter(results[0].geometry.location);
        this.map.fitBounds(results[0].geometry.viewport);
      });
    },
  },
   async mounted() {
     try {
Adding a list sort animation
Now that we have implemented the basic functionality, we can make it even better by adding an animation for sorting the list of stores.
 <template>
  <ul class="StoreFinderList">
  <TransitionGroup
    name="StoreFinderList__item-"
    tag="ul"
    class="StoreFinderList"
  >
     <StoreFinderItem
       v-for="store in stores"
       :key="store.id"
       :address="store.content.address"
       :name="store.name"
       :opening-hours="store.content.opening_hours"
       class="StoreFinderList__item"
     />
  </ul>
  </TransitionGroup>
 </template>

 <script>
Thanks to the TransitionGroup component which Vue.js provides to us by default, we can add a fancy animation fairly easy. Instead of using an <ul> tag, we use a <TransitionGroup> which renders to an <ul>. Using StoreFinderList__item- as the name of the transition group is a little trick to make the generated CSS classes work with our BEM naming scheme.
 @import '../assets/scss/settings/**/*';

 .StoreFinderList__item {
  transition-duration: 0.3s;
  transition-property: opacity, transform;

   &:not(:first-child) {
     margin-top: setting-spacing(m);
     padding-top: setting-spacing(m);
     border-top: 1px solid #e0e0e0;
   }
 }

.StoreFinderList__item--enter,
.StoreFinderList__item--leave-to {
  opacity: 0;
}

.StoreFinderList__item--leave-active {
  position: absolute;
}
 </style>
Above you can see the CSS styles necessary to make the list animation work.
Showing the distance to the given address
Another small little improvement we can make is to render the distance of the stores to the address the user has entered.
       <div class="StoreFinderItem__section">
         <div class="StoreFinderItem__headline">
           {{ name }}
          <span
            v-if="distance"
            class="StoreFinderItem__distance"
          >
            - {{ distance }} km
          </span>
         </div>
         {{ address.postal_code }}
         {{ address.town }}<br>
First we add a new <span> tag rendering the distance inside of the <template> of the StoreFinderItem component.
       required: true,
       type: Object,
     },
    distance: {
      default: null,
      type: Number,
    },
     name: {
       default: '',
       required: true,
Next we have to make the StoreFinderItem component accept a new distance property.
     margin-top: setting-spacing(s);
   }
 }

.StoreFinderItem__distance {
  font-weight: normal;
  color: #999;
}
 </style>
Additionally we add some basic styling for the new <span> tag we've added.
       v-for="store in stores"
       :key="store.id"
       :address="store.content.address"
      :distance="store.distance"
       :name="store.name"
       :opening-hours="store.content.opening_hours"
       class="StoreFinderList__item"
Finally, we also have to provide a value for the newly added distance property. We do this inside of the <template> section of the StoreFinderList component.
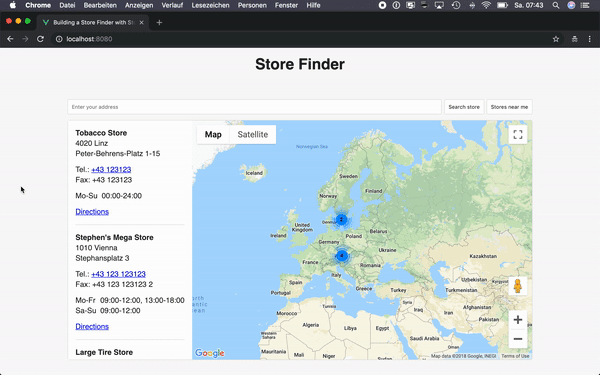
The final result
If you want to see the Store Finder application we've built live and in action you can take a look at this demo page.
Wrapping it up
I think this use case is a great example of how a headless CMS enables you to build anything you want instead of limiting your possibilities by forcing you to use a particular plugin and restricting the options for customization as is the case with many traditional content management systems.
Although this is still a very basic implementation of a Store Finder it can serve as a solid starting point for creating your own implementation of it.
